
In this blog, we delve into the powerful integration of WPGraphQL with Advanced Custom Fields (ACF), exploring how to effectively utilize these tools for headless WordPress development. Join us as we navigate through essential concepts, practical demos, and advanced techniques to enhance your projects.
Table of Contents
- Introduction to WPGraphQL and ACF
- Setting Up the Environment
- Activating WPGraphQL
- Exploring the GraphQL IDE
- Basic GraphQL Queries
- Introduction to ACF
- Integrating ACF with WPGraphQL
- Working with ACF Field Types
- Using GraphQL Fragments
- Implementing ACF Blocks
- Querying ACF Blocks in GraphQL
- Best Practices for ACF and WPGraphQL
- Upcoming Events and Resources
- FAQ
Introduction to WPGraphQL and ACF
WPGraphQL is a powerful open-source plugin that allows developers to utilize GraphQL with their WordPress sites. It provides a structured way to query data, making it easier to integrate WordPress with modern frontend frameworks. On the other hand, Advanced Custom Fields (ACF) is a popular plugin that enhances WordPress’s capabilities by enabling custom fields for posts, pages, and custom post types.
When combined, WPGraphQL and ACF unlock new possibilities for developers, allowing them to create rich, dynamic applications while leveraging WordPress as a headless CMS. This integration simplifies the process of fetching custom data and enhances the overall development experience.
Benefits of Using WPGraphQL with ACF
- Flexibility: Developers can define exactly what data they need through tailored queries.
- Efficiency: Reduces the amount of data transferred by only fetching necessary fields.
- Enhanced User Experience: Enables the creation of interactive applications with real-time data retrieval.
- Strong Community Support: Both WPGraphQL and ACF have active communities and extensive documentation.
Setting Up the Environment
Before diving into WPGraphQL and ACF, it’s essential to set up your development environment. This entails installing WordPress, along with the required plugins, to ensure a smooth development process.
Begin by installing a local development environment such as Local WP or MAMP. Once your environment is ready, create a new WordPress site. This vanilla setup will allow you to install and activate the necessary plugins without any pre-existing configurations.
Installing Required Plugins
To work with WPGraphQL and ACF, you need to install the following plugins:
- WPGraphQL
- Advanced Custom Fields
Both plugins can be found in the WordPress Plugin Repository. Simply navigate to the ‘Plugins’ section in your WordPress dashboard, search for each plugin, and click ‘Install Now’. After installation, activate both plugins to get started.
Activating WPGraphQL
Once the WPGraphQL plugin is activated, it sets up a GraphQL endpoint for your WordPress site. This endpoint will serve as the primary communication channel between your frontend application and WordPress.
To access the GraphQL endpoint, simply navigate to your-site-url/graphql. This URL will allow you to send GraphQL queries and receive responses in JSON format.
After activating WPGraphQL, you will also notice a new menu item in your WordPress dashboard labeled ‘GraphQL’. This section provides access to the GraphiQL IDE, where you can explore the GraphQL schema and execute queries.
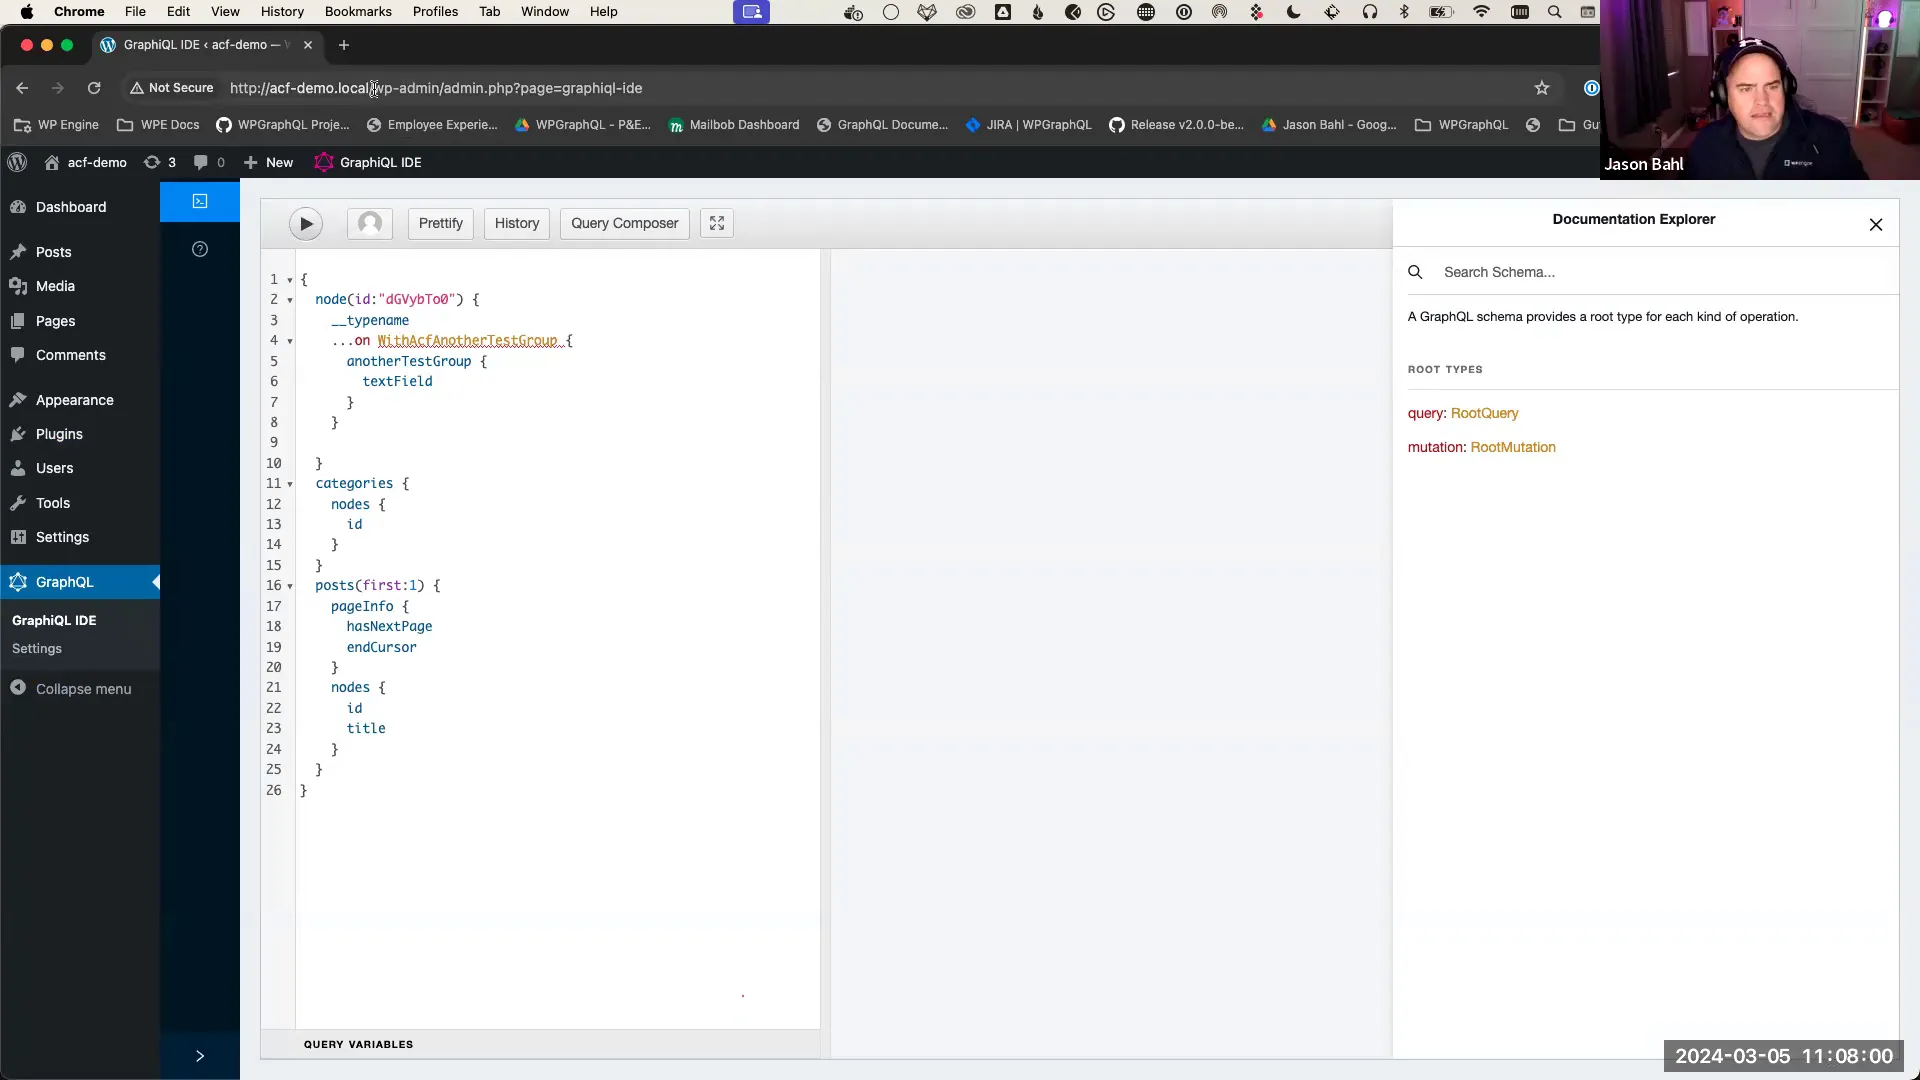
Exploring the GraphQL IDE
The GraphiQL IDE is an interactive interface that allows you to explore the GraphQL schema and execute queries. It provides a user-friendly environment to experiment with different queries and see the results in real-time.
To access the GraphiQL IDE, click on the ‘GraphQL’ menu in your WordPress dashboard and select ‘GraphiQL IDE’. Here, you will find a sidebar that displays the available queries, types, and fields that you can request.
As you navigate through the IDE, you’ll notice that it offers autocomplete suggestions, making it easier to structure your queries correctly. Familiarize yourself with the various fields available, as this will be crucial when crafting your queries.
Understanding the GraphQL Schema
The GraphQL schema defines the structure of the data available through the API. It outlines the types of data you can query, including posts, pages, categories, and custom fields created with ACF.
Within the schema, you can explore the available queries and their corresponding fields. For instance, you can query for posts and specify which fields you want to retrieve, such as title, content, or custom fields defined by ACF.
Basic GraphQL Queries
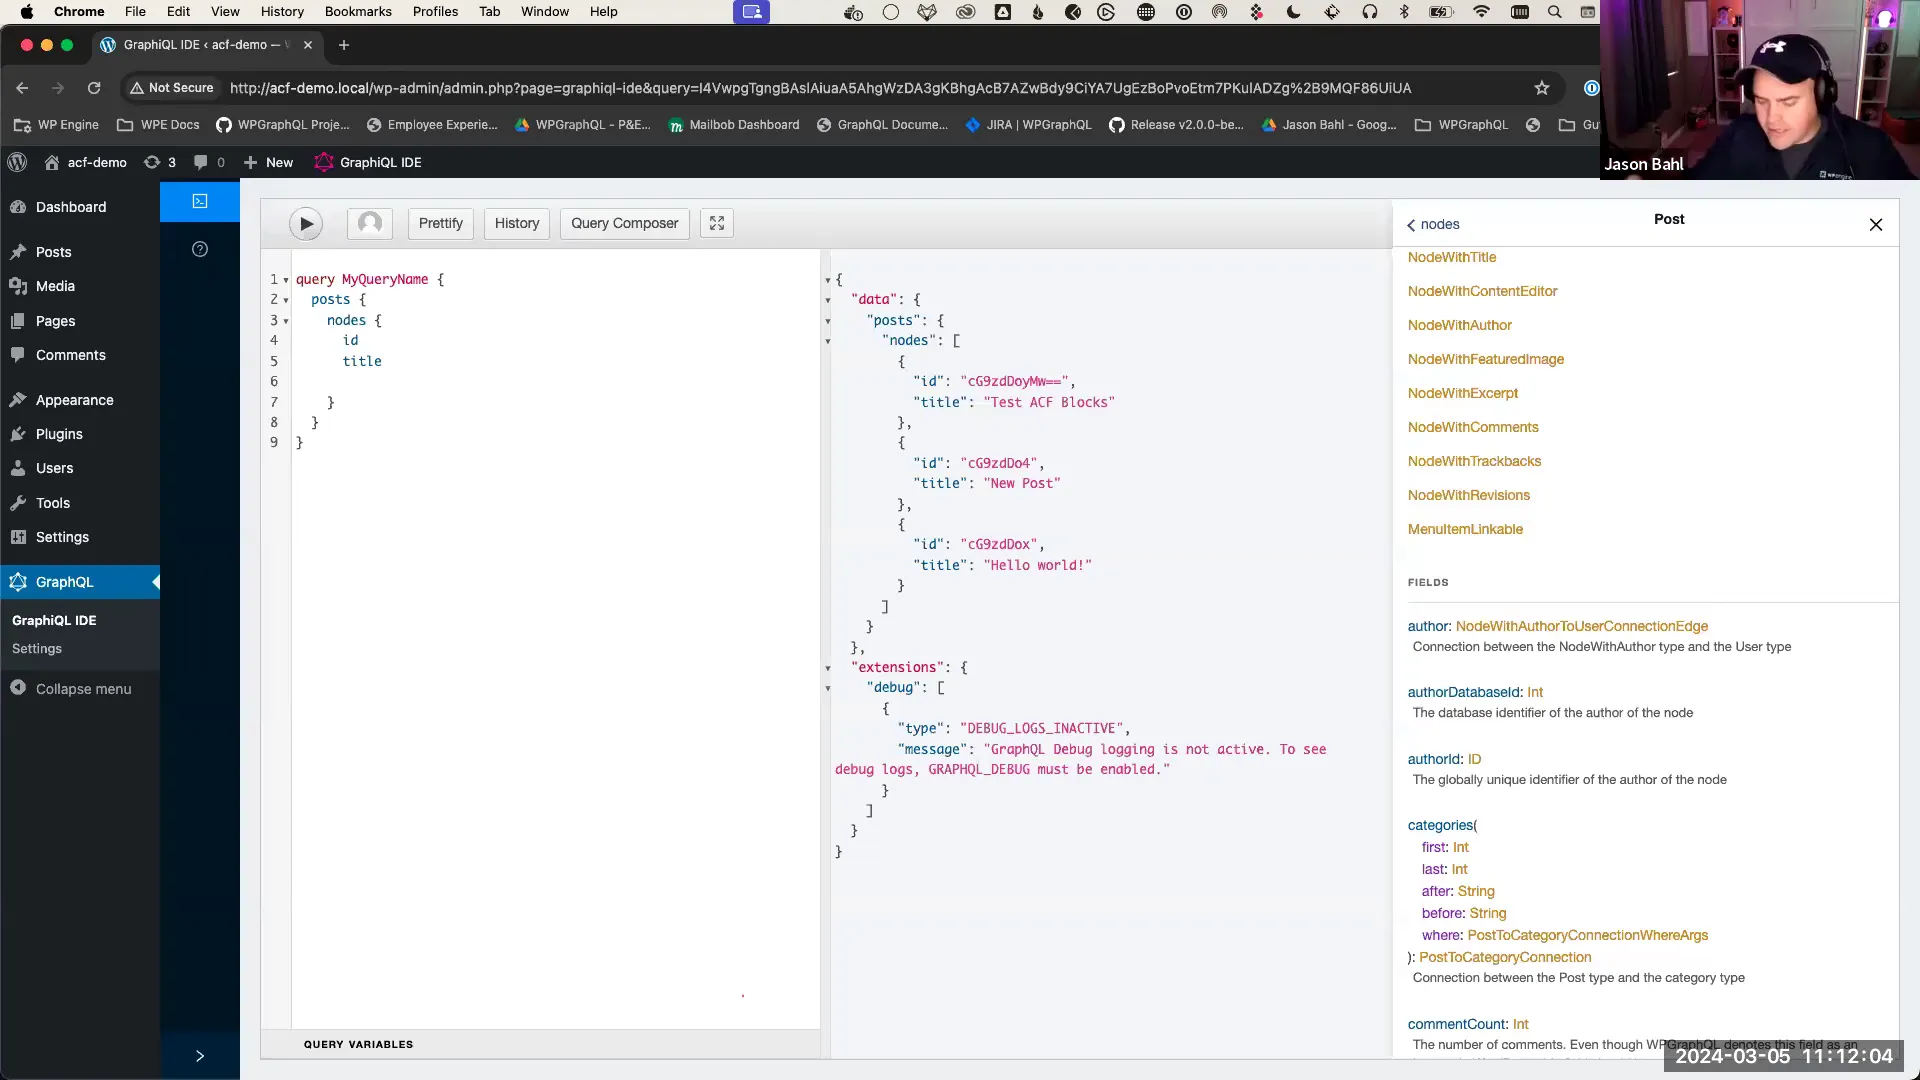
Now that you are familiar with the GraphQL IDE, let’s explore some basic queries you can perform. The power of GraphQL lies in its ability to fetch precisely the data you need.
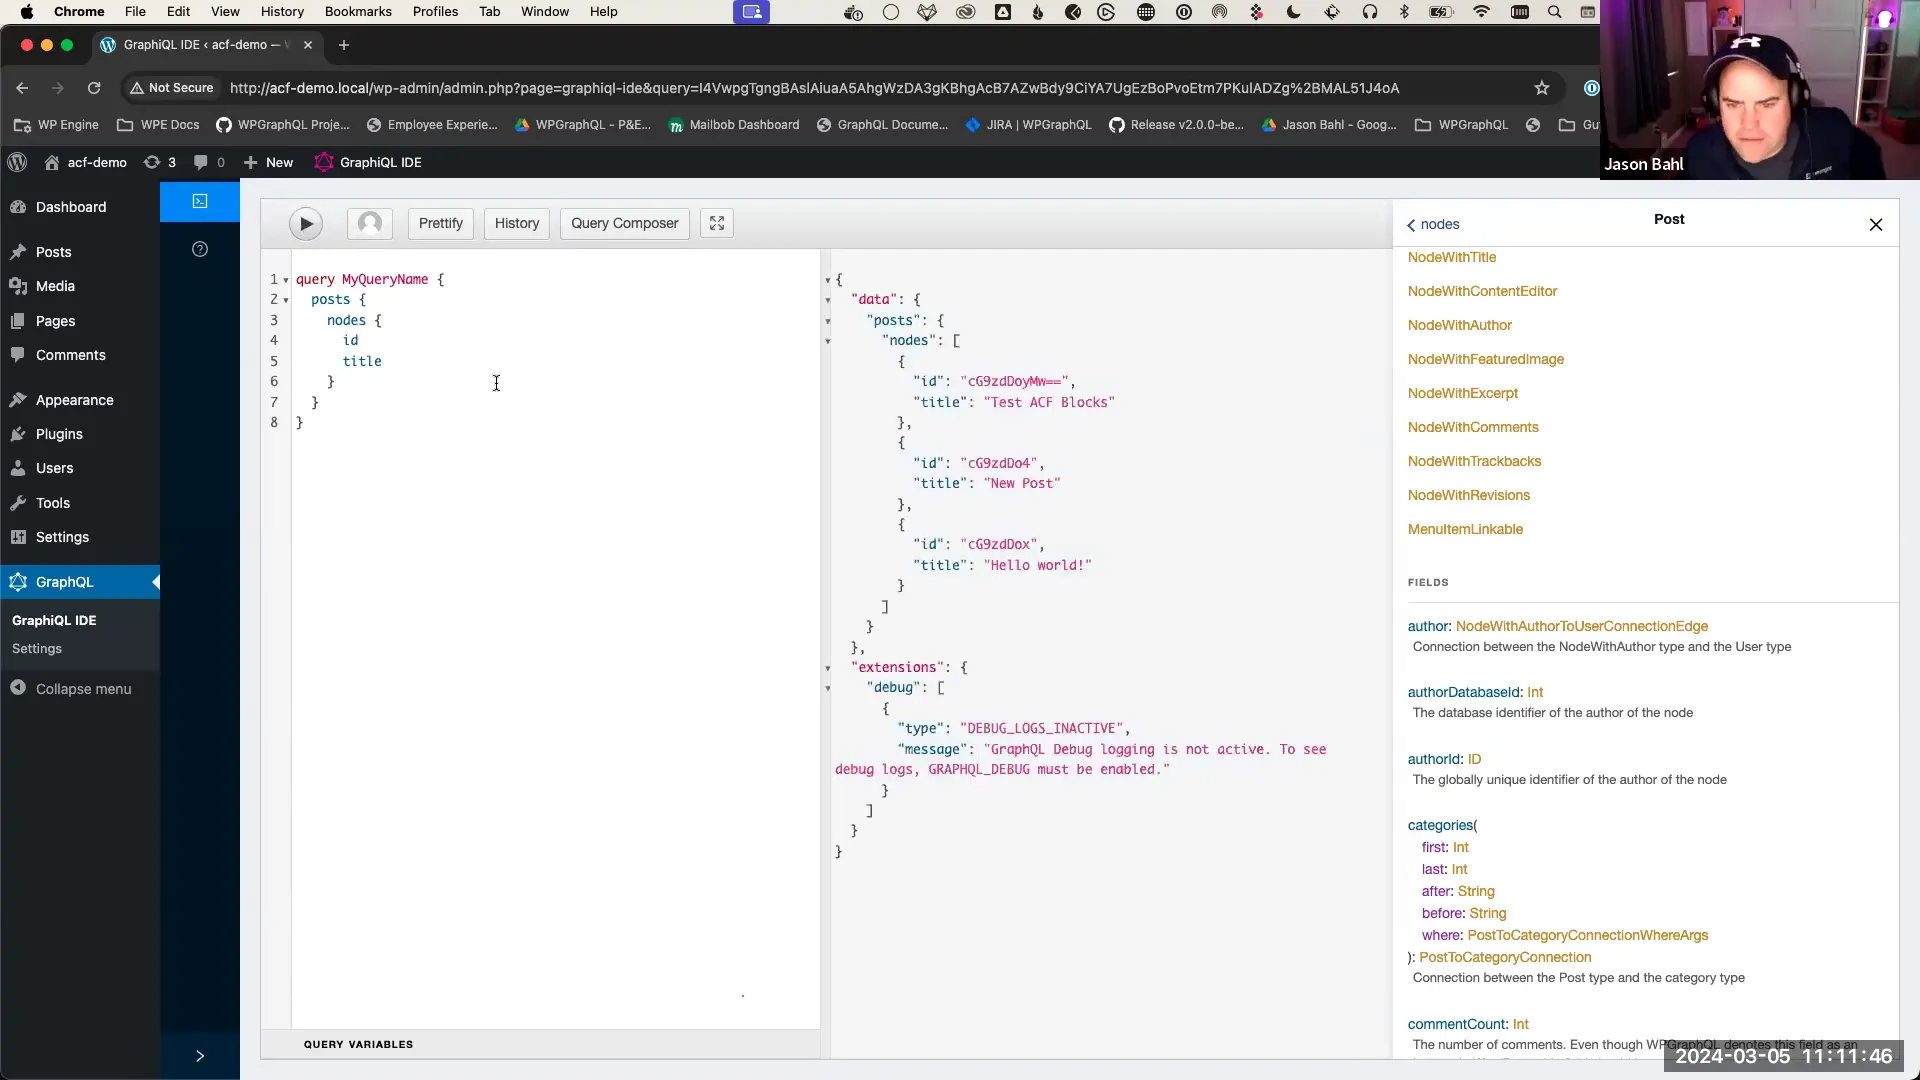
Fetching Posts
To fetch a list of posts, you can use the following query:
{
  posts {
    nodes {
      id
      title
    }
  }
}
This query retrieves the ID and title of all posts in your WordPress installation. Once you execute the query, the results will be displayed in the IDE, showcasing the data structure returned from WordPress.
Querying for Custom Fields
If you have custom fields set up using ACF, you can easily query these fields alongside the standard post data. For example:
{
  posts {
    nodes {
      id
      title
      acf {
        customFieldName
      }
    }
  }
}
In this query, replace customFieldName with the actual name of your ACF field. This allows you to retrieve both standard and custom data in a single query.
Fetching Related Resources
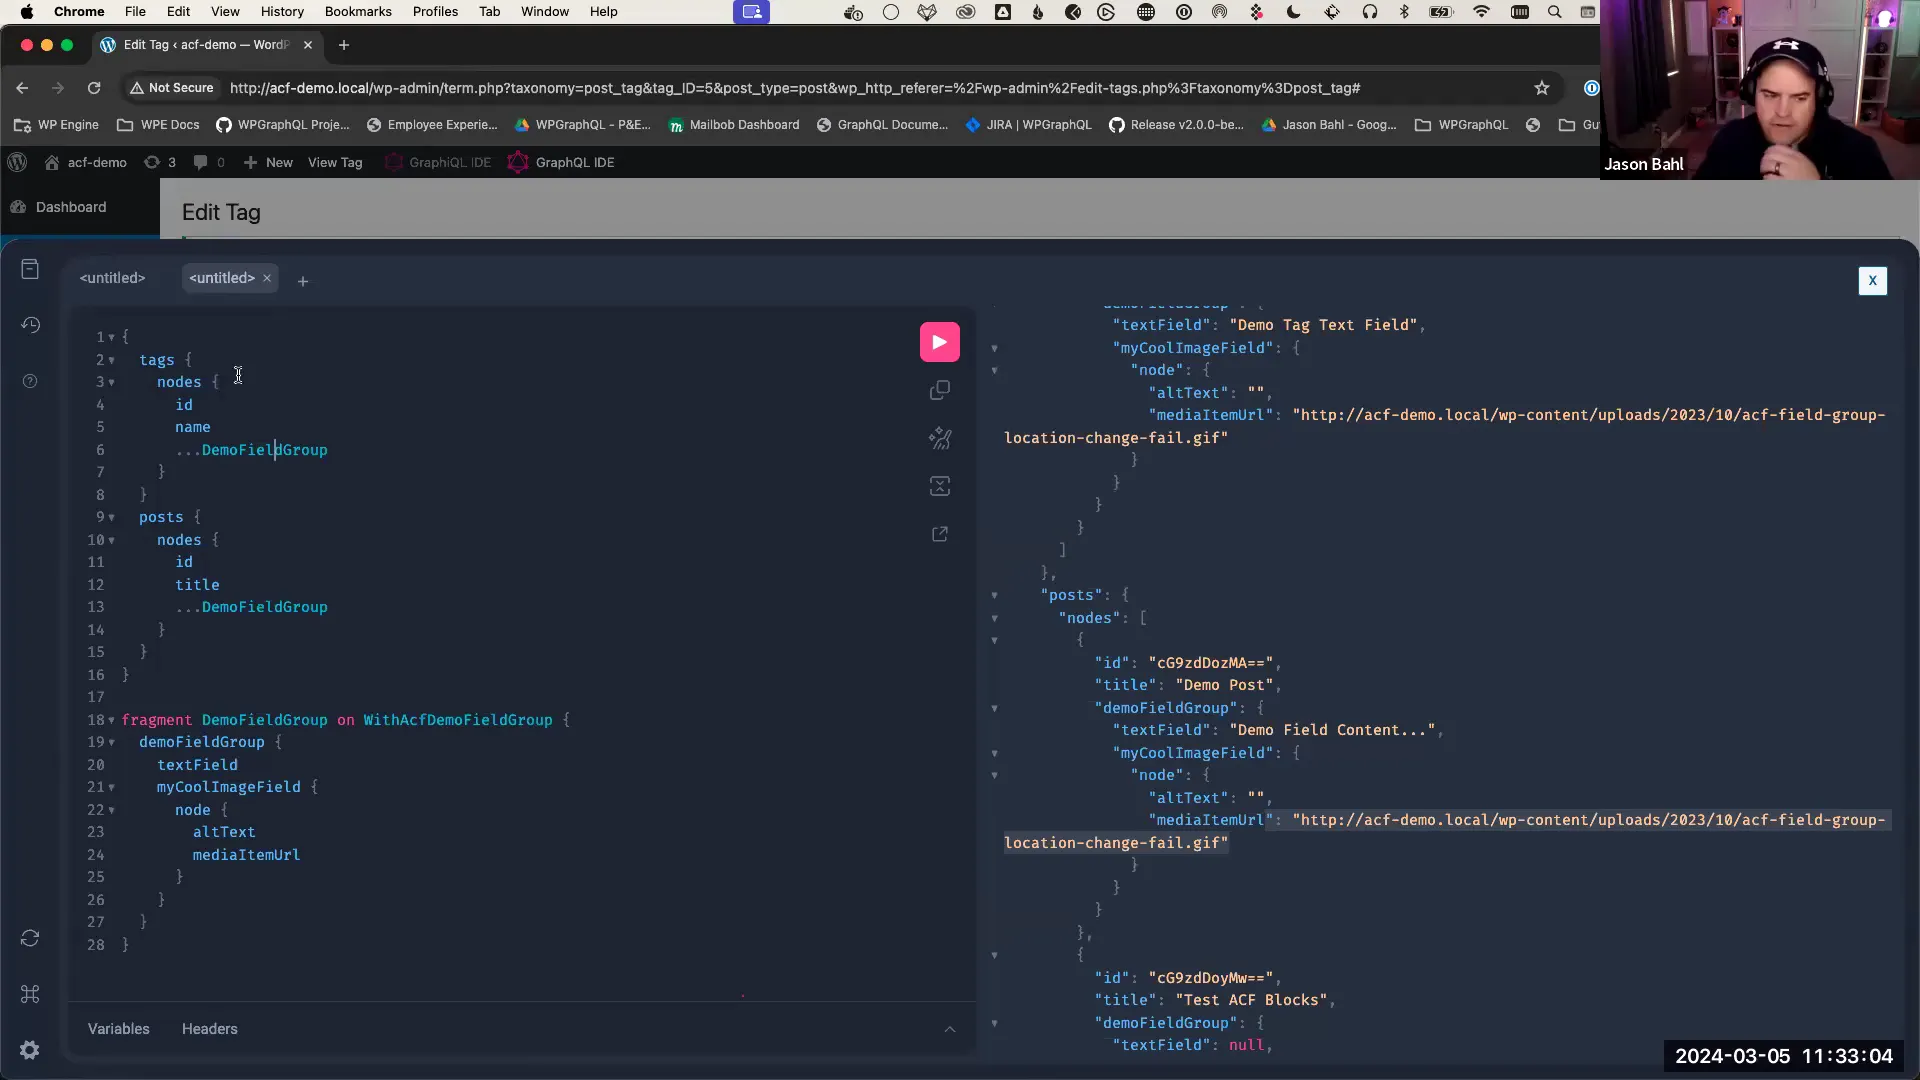
GraphQL also allows you to fetch related resources in a single query. For instance, if you want to retrieve tags associated with your posts, you can modify your query as follows:
{
  posts {
    nodes {
      id
      title
      tags {
        nodes {
          id
          name
        }
      }
    }
  }
}
This query will return the ID and name of each tag associated with the posts. The nested structure of the query reflects the relationships between posts and tags in WordPress.

Introduction to ACF
Advanced Custom Fields (ACF) is an indispensable tool for developers looking to enhance the functionality of their WordPress sites. It allows users to create custom fields for posts, pages, and custom post types, providing flexibility that goes beyond WordPress’s default capabilities. With ACF, you can tailor your content management experience to suit your specific needs.
While ACF offers a free version, the Pro version includes additional features such as repeater fields, flexible content fields, and more. These features empower developers to build complex layouts and rich content structures without sacrificing the user experience.
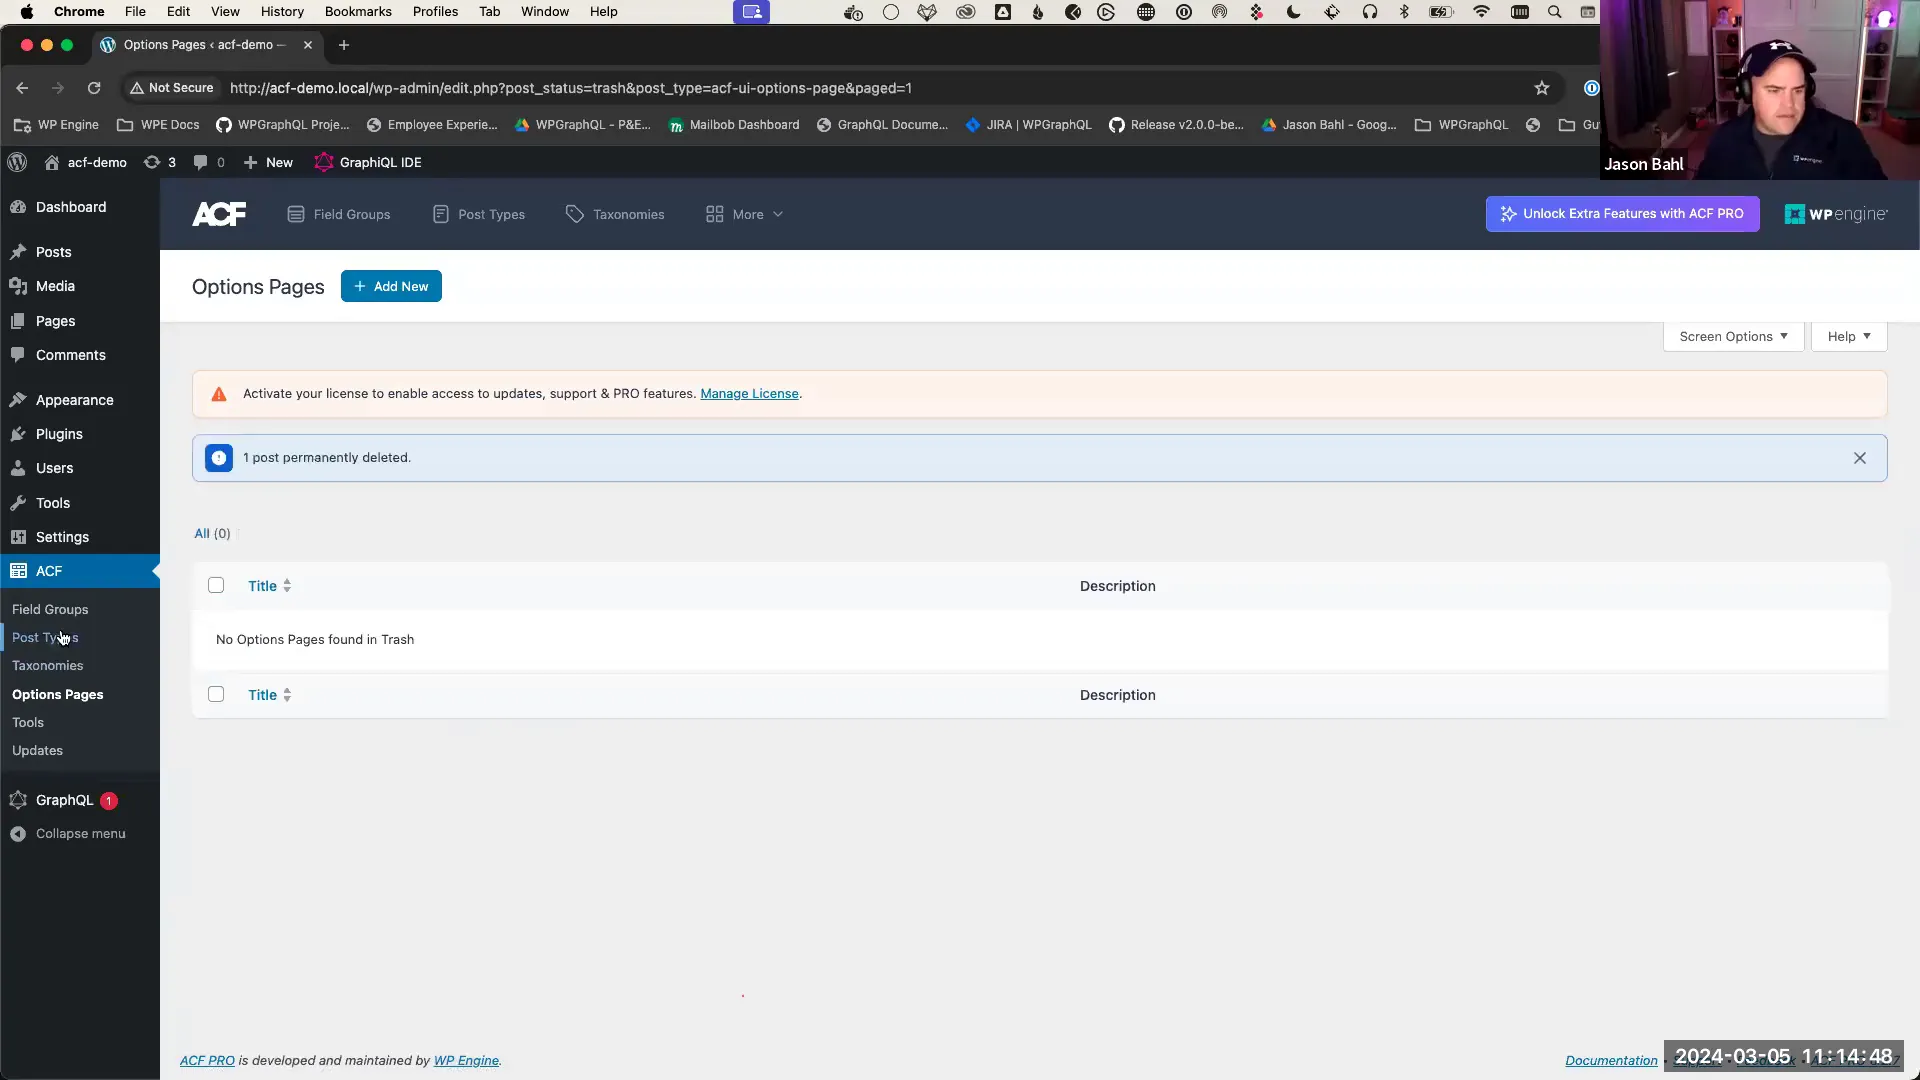
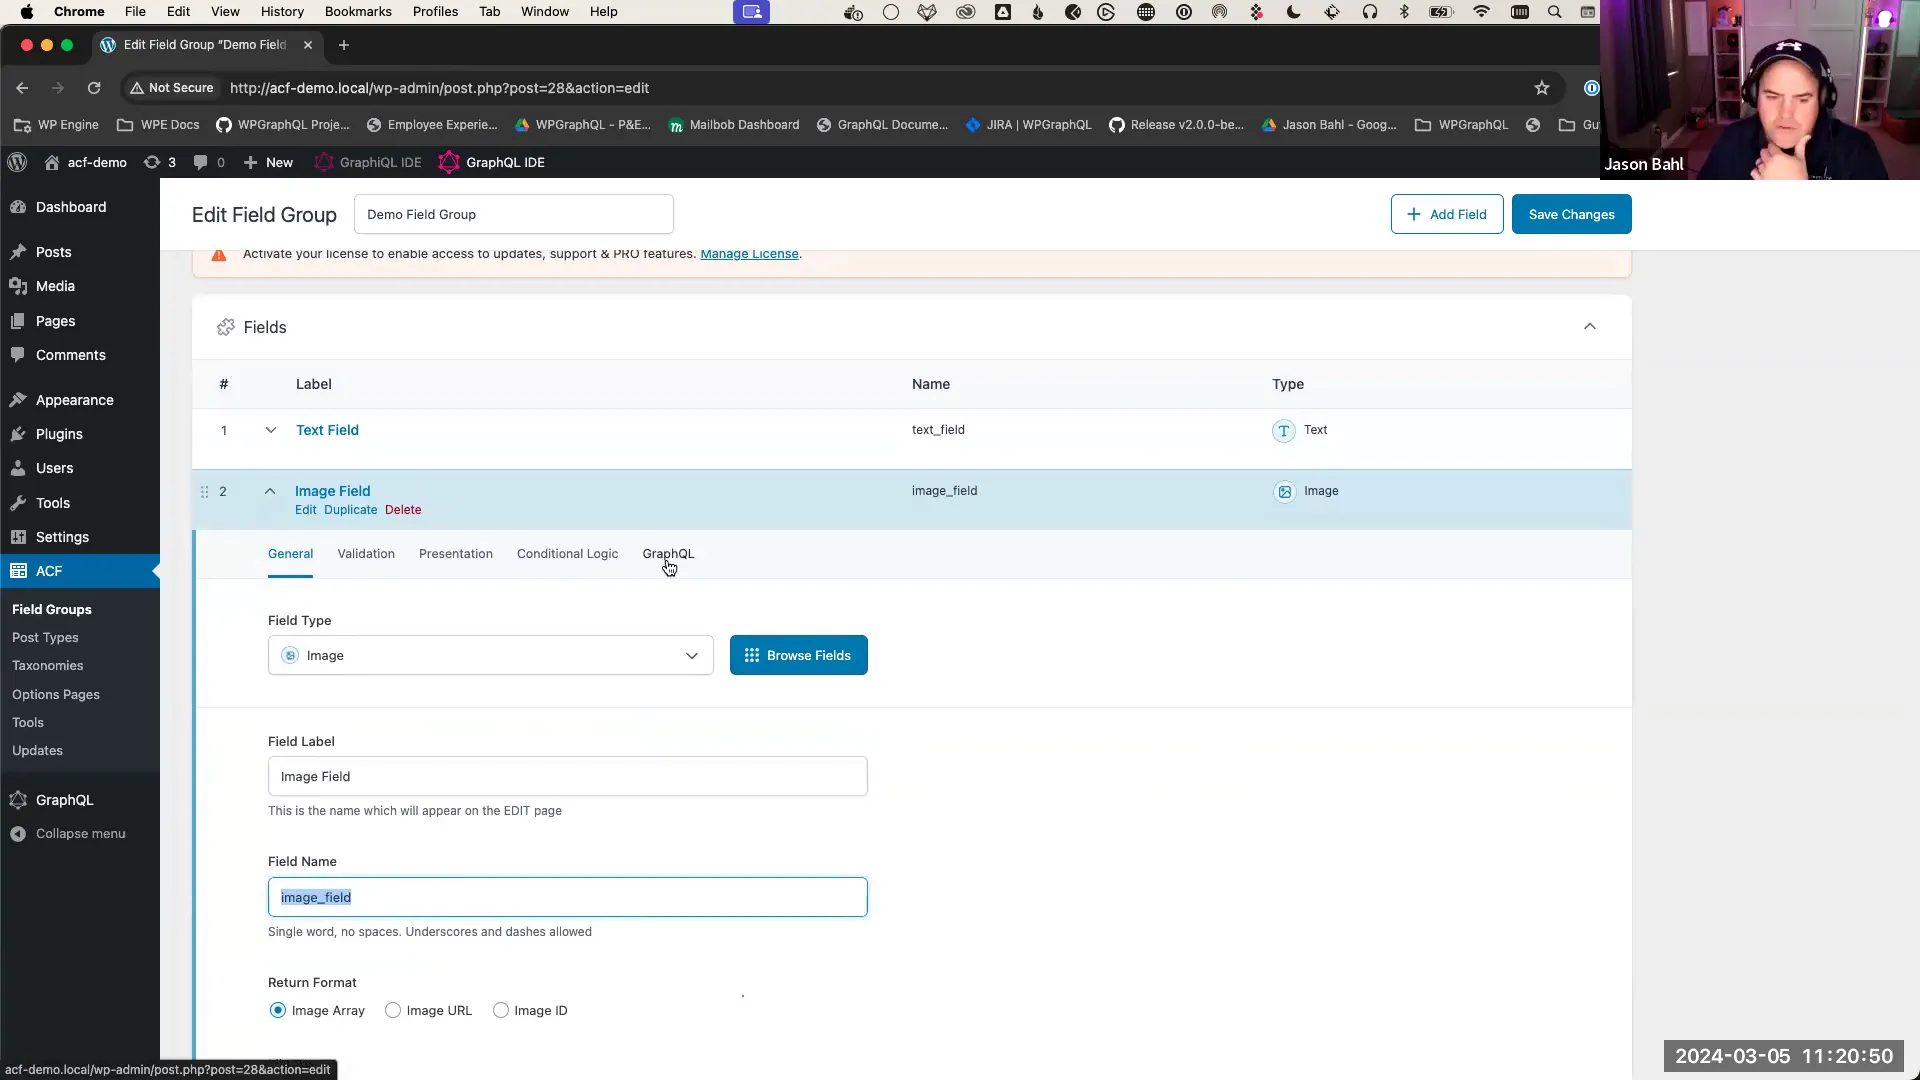
Creating ACF Field Groups
To get started with ACF, the first step is to create field groups. Field groups are collections of custom fields that can be assigned to various content types within WordPress.
You can create field groups directly within the WordPress admin interface, or programmatically using PHP. For this guide, we’ll focus on the UI method for simplicity. Here’s how to create a field group:
- Navigate to the ACF section in your WordPress admin dashboard.
- Click on “Add New” to create a new field group.
- Give your field group a name, such as “Demo Field Group”.
- Add fields to the group, such as a text field or an image field.
- Set location rules to determine where this field group will appear in the admin interface.
Assigning ACF Fields to Locations
Once you create a field group, you need to assign it to specific locations. This is done through location rules that specify where the fields will appear in the WordPress admin. For instance, you can assign a field group to all posts or specific post types.
When editing a post that meets the location criteria, you will see the custom fields available for input. This integration allows for enhanced content management directly within the familiar WordPress interface.
Integrating ACF with WPGraphQL
To expose ACF data through GraphQL, you need to integrate WPGraphQL with ACF. This is achieved by installing the WPGraphQL for ACF plugin, which acts as a bridge between the two.
Once the plugin is activated, your custom fields will be automatically added to the GraphQL schema. This means you can now query ACF fields using GraphQL, making it easier to retrieve custom data alongside standard WordPress data.
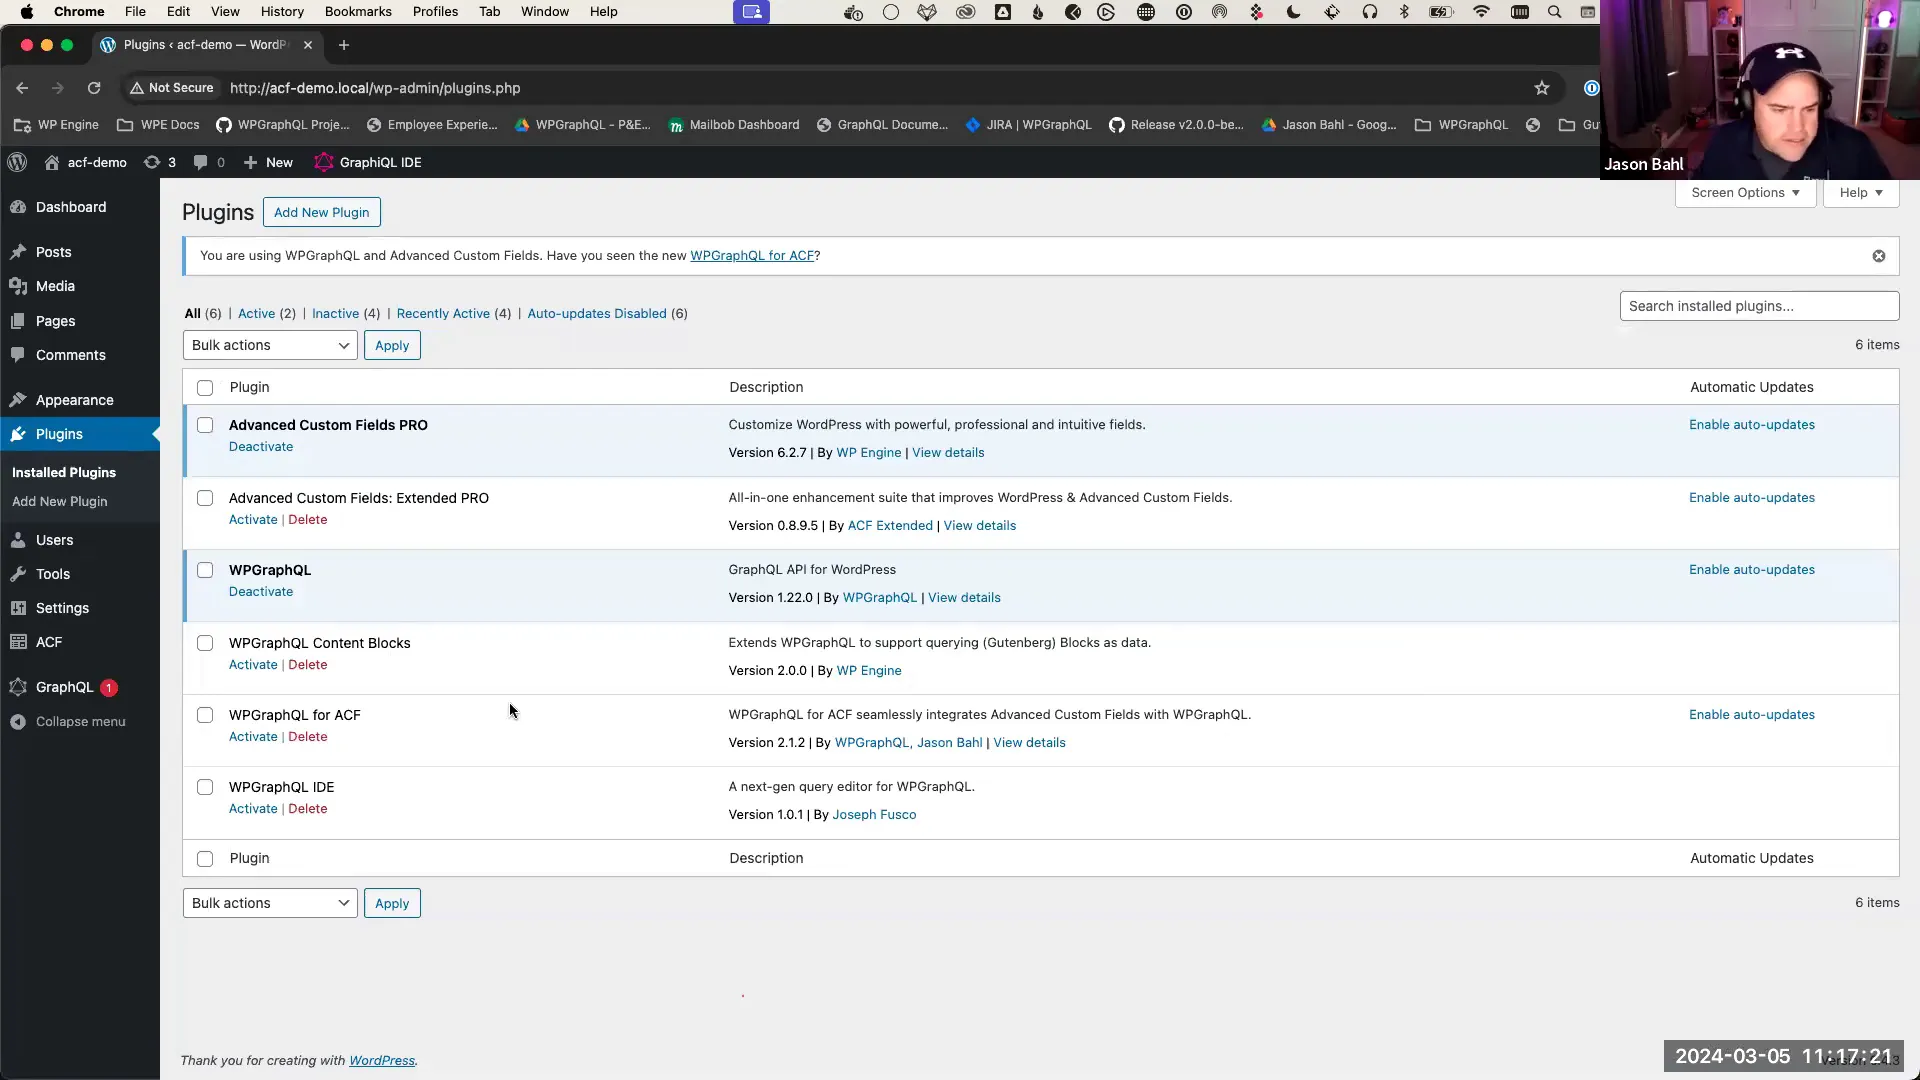
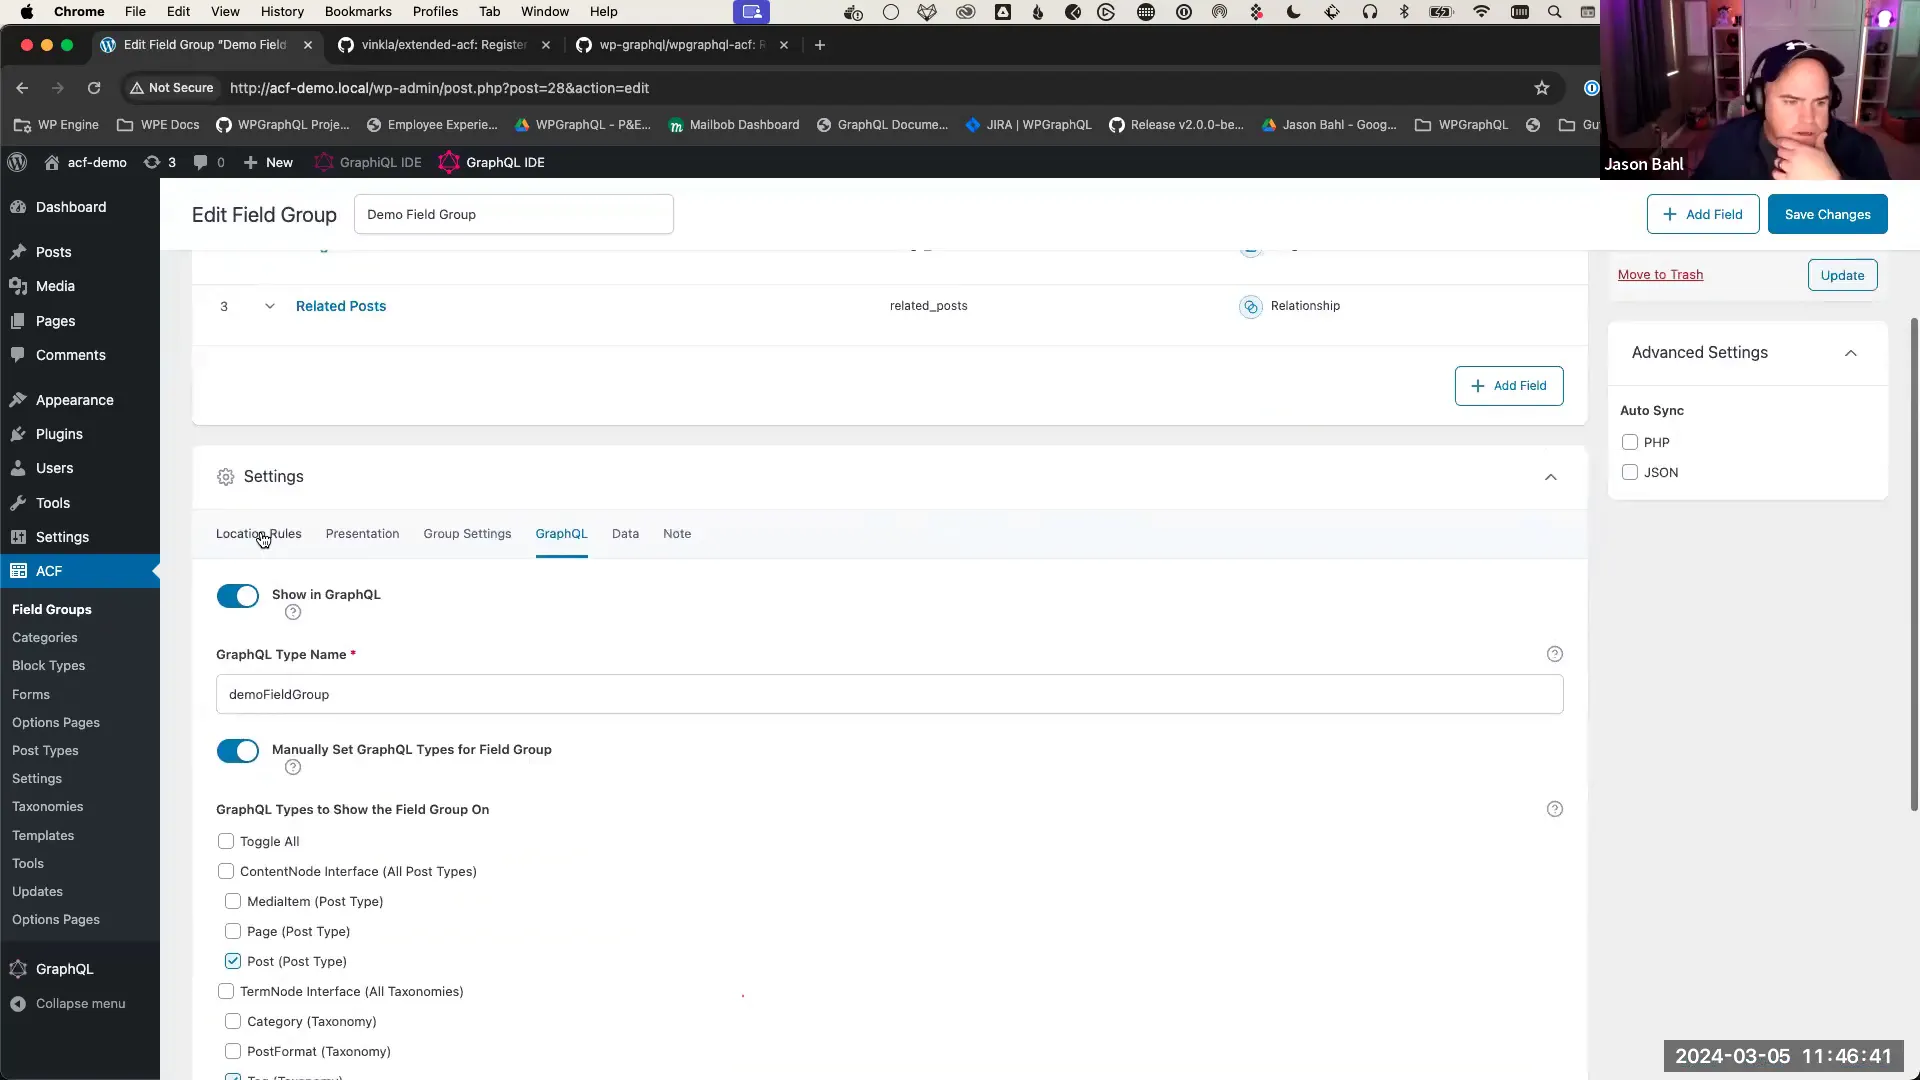
Activating WPGraphQL for ACF
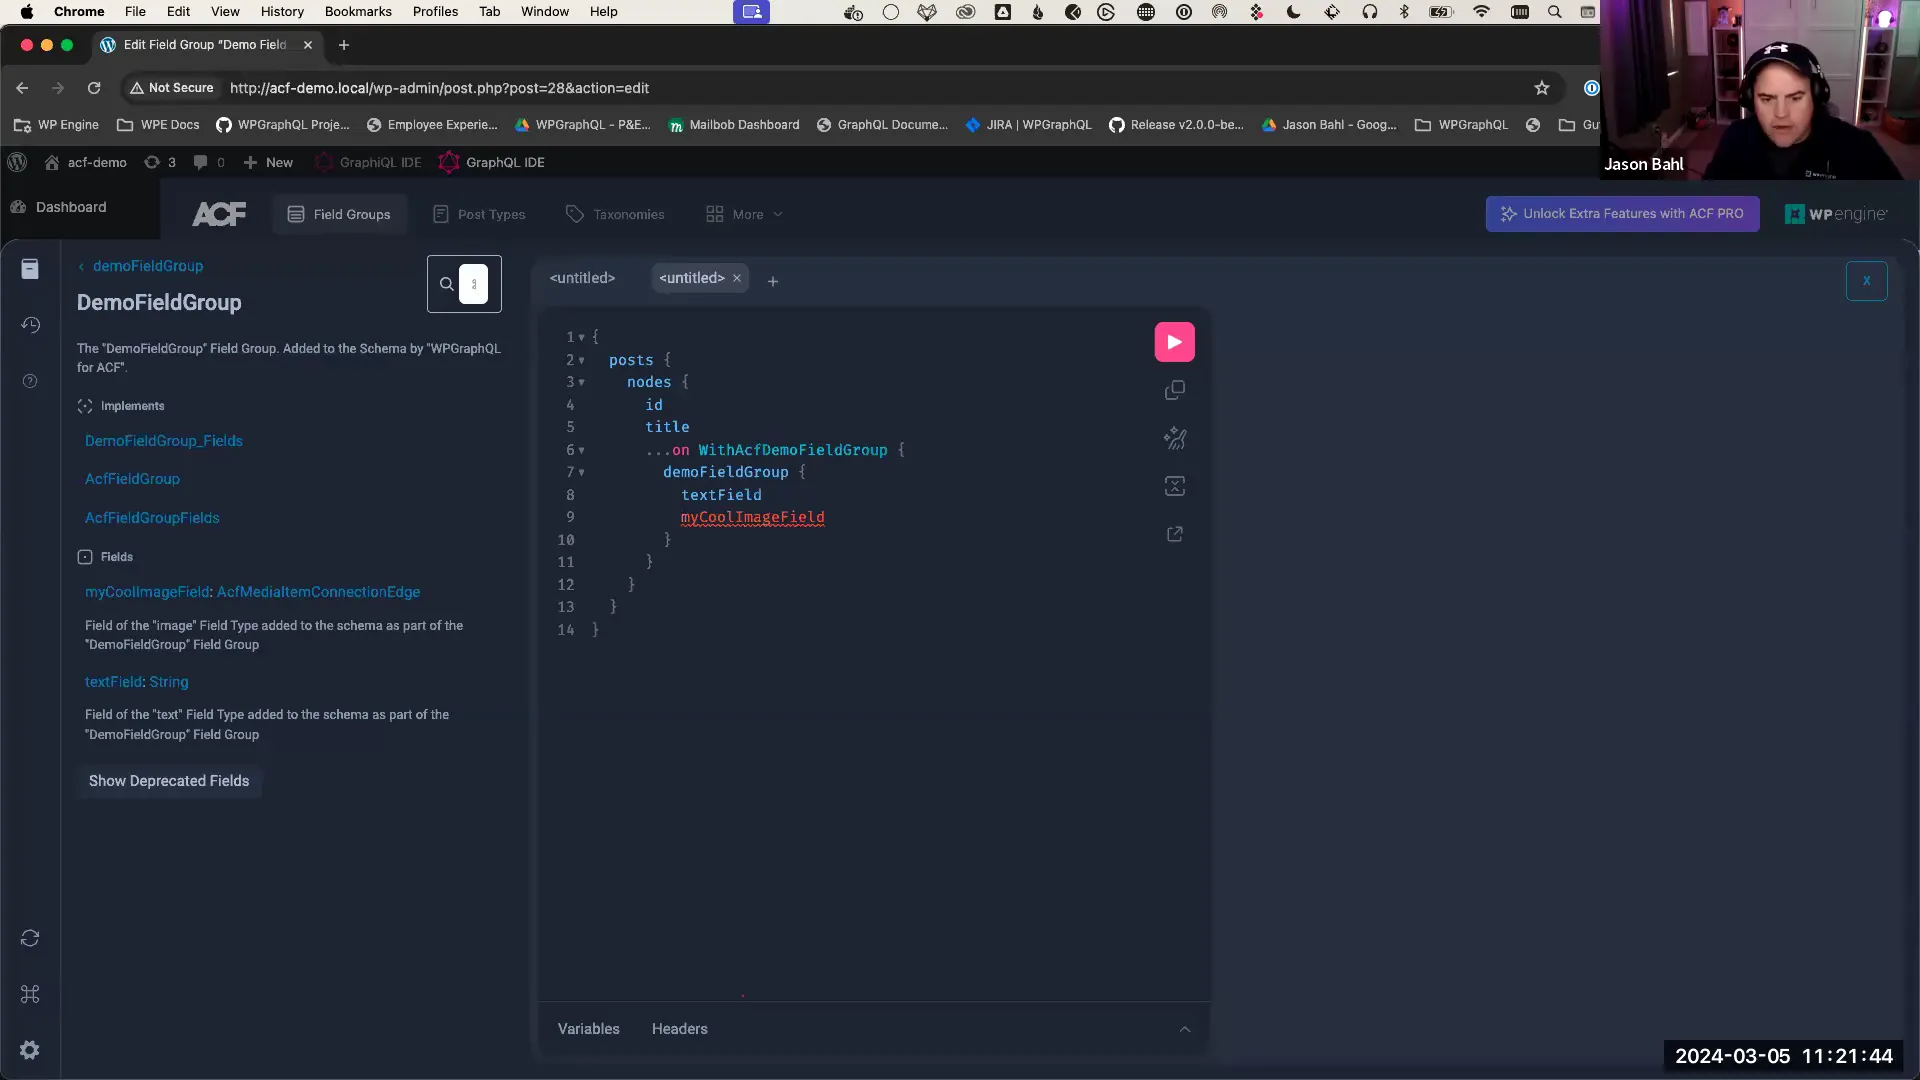
After installing the WPGraphQL for ACF plugin, you will notice new fields in the list table for your field groups. Each field group will now have a corresponding GraphQL type name, such as “Demo Field Group”. This integration allows you to access your custom fields through GraphQL queries.
To verify the integration, you can use the GraphiQL IDE to explore the schema. Look for your ACF field group and see how it is represented within the GraphQL structure. This will give you insight into how to query these fields effectively.

Working with ACF Field Types
ACF supports various field types, each designed to handle different kinds of data. Some common field types include:
- Text Field: A simple input field for text.
- Image Field: Allows users to upload and select images from the media library.
- Repeater Field: Enables the addition of multiple sets of fields.
- Flexible Content Field: Provides a way to create complex layouts with different content blocks.
When you create a new field, you can customize its settings, including whether it should be visible in GraphQL queries. This flexibility allows you to control the data exposure based on your project’s requirements.
Querying ACF Fields with GraphQL
Once your ACF fields are set up and integrated with WPGraphQL, you can easily query them. For example, to retrieve a post’s title and a custom text field, you can use a query like this:
{
  posts {
    nodes {
      id
      title
      acf {
        demoFieldGroup {
          textField
        }
      }
    }
  }
}
This query fetches the post ID, title, and the value of the custom text field defined in your ACF setup. The integration allows you to seamlessly blend standard WordPress data with custom ACF fields.
Using GraphQL Fragments
One of the most powerful features of GraphQL is the ability to use fragments. Fragments allow you to define reusable units of a query that can be included in multiple places. This is particularly useful when working with ACF fields, as it helps to keep your queries DRY (Don’t Repeat Yourself).
To create a fragment, you can use the following syntax:
fragment demoFieldGroup on ACFDemoFieldGroup {
  textField
  imageField {
    mediaItemUrl
    altText
  }
}
Once defined, you can include this fragment in your queries, simplifying the structure and improving readability. This way, if you need to change the fields being queried, you only have to update the fragment definition.
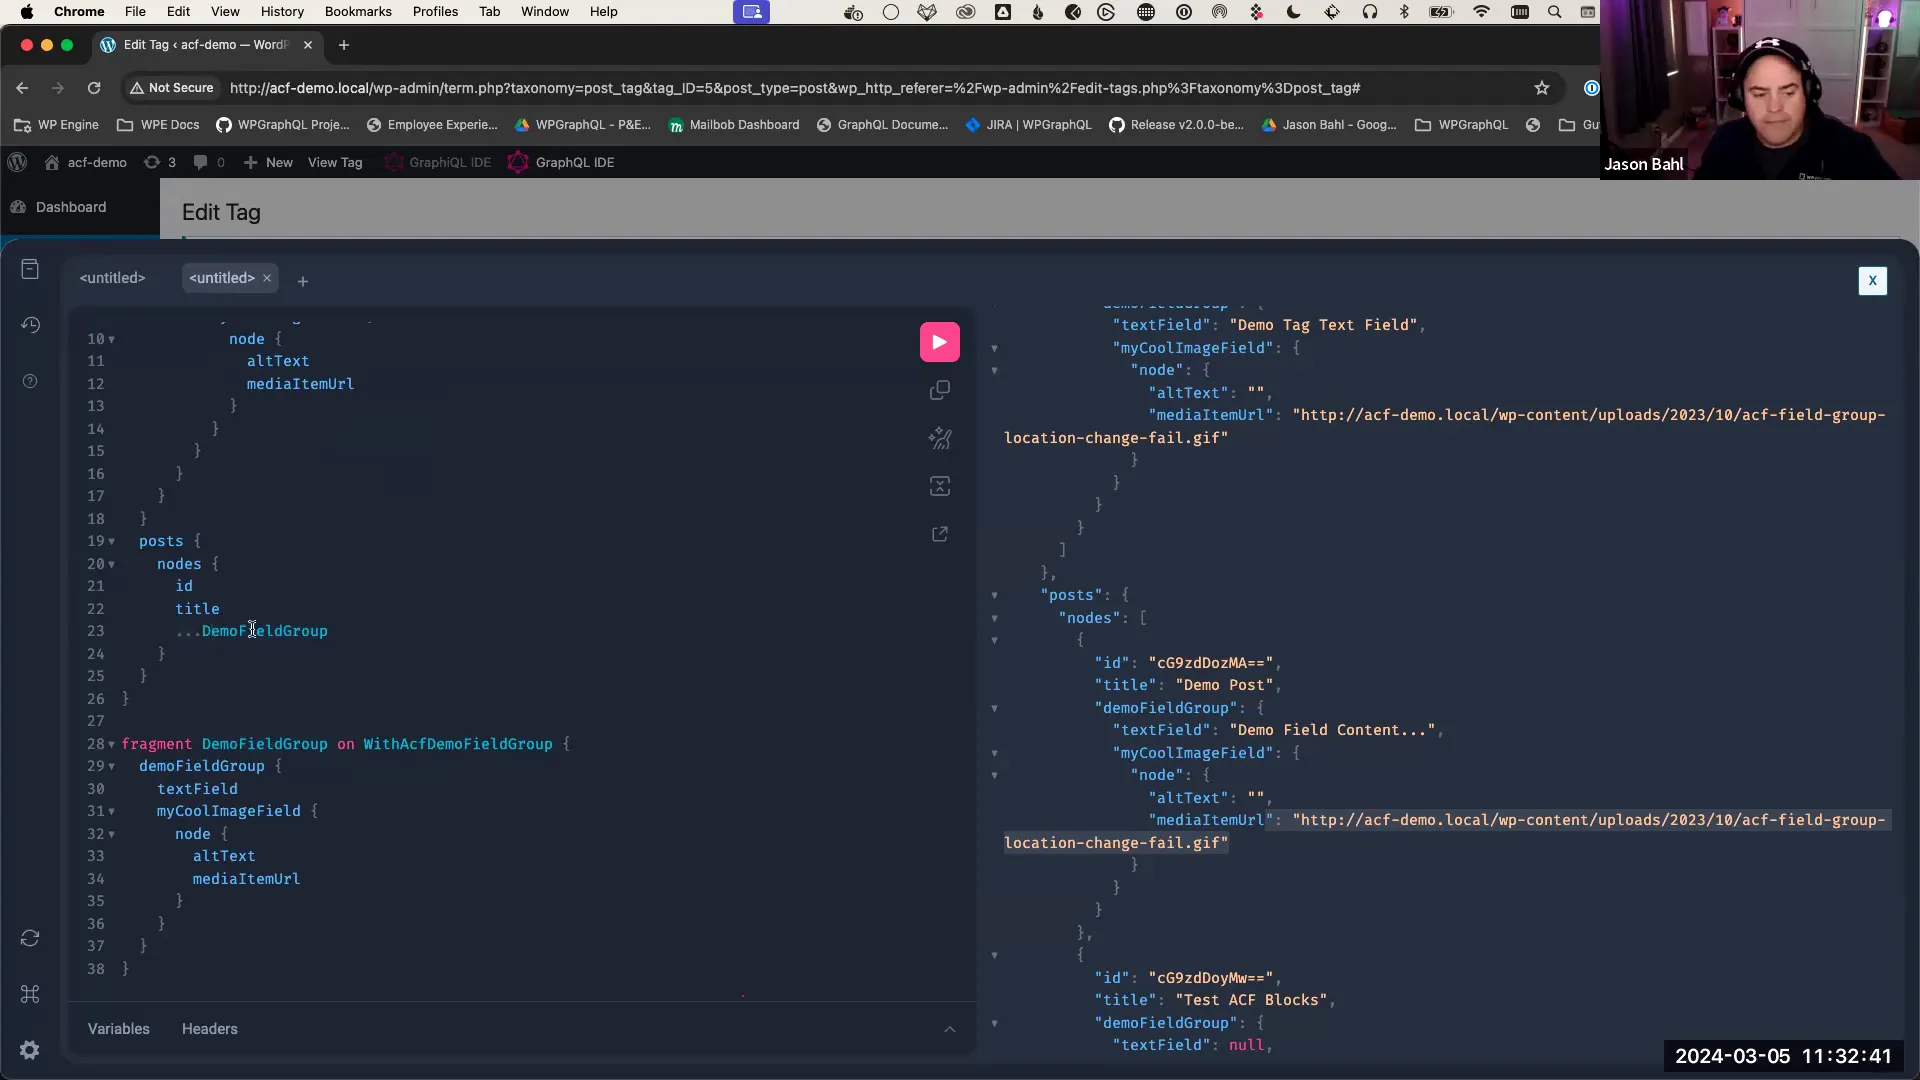
Combining Queries with Fragments
With fragments, you can combine multiple queries into a single request. For instance, you can query both posts and tags that utilize the same ACF field group:
{
  posts {
    nodes {
      ...demoFieldGroup
    }
  }
  tags {
    nodes {
      ...demoFieldGroup
    }
  }
}
This structure allows you to retrieve data from different types of nodes while maintaining a consistent query format. The use of fragments ensures that your code remains clean and maintainable.
Implementing ACF Blocks
ACF Blocks is a powerful feature of ACF Pro that allows developers to create custom blocks for the WordPress block editor. This functionality greatly enhances the versatility of WordPress as a content management system. By using ACF Blocks, you can easily add custom fields to your blocks, providing a seamless experience for content editors.
To register ACF Blocks, you can utilize the ACF Extended Pro plugin, which offers an intuitive interface for managing block types without the need for extensive coding. This makes the process accessible even for those who may not be deeply familiar with PHP.
Creating a Demo Block
To create a new block, navigate to the ACF Extended Pro settings in your WordPress dashboard. Here’s how to do it:
- Select “Add New” under the Blocks section.
- Name your block, for example, “Demo Block”.
- Provide a description and set its category in the block editor.
- Define location rules to determine where the block will appear, such as on posts or pages.
- Save your new block.
Once the block is created, you can add custom fields to it using the field groups you have already defined in ACF.
Adding Fields to the Block
After creating the block, you can assign existing field groups to it. This allows content editors to fill in the fields when using the block in the editor. To do this, simply edit the block settings and set the location rules to match your new block.
When editing a post, the block will now show the assigned fields, making it incredibly easy to add rich content without leaving the block editor.
Querying ACF Blocks in GraphQL
To query ACF Blocks in GraphQL, you need to install the WP GraphQL Content Blocks plugin. This plugin adds support for querying blocks, making it possible to retrieve block data through GraphQL queries.
Once activated, you can explore the schema in the GraphiQL IDE to see the new block types and fields available for querying.

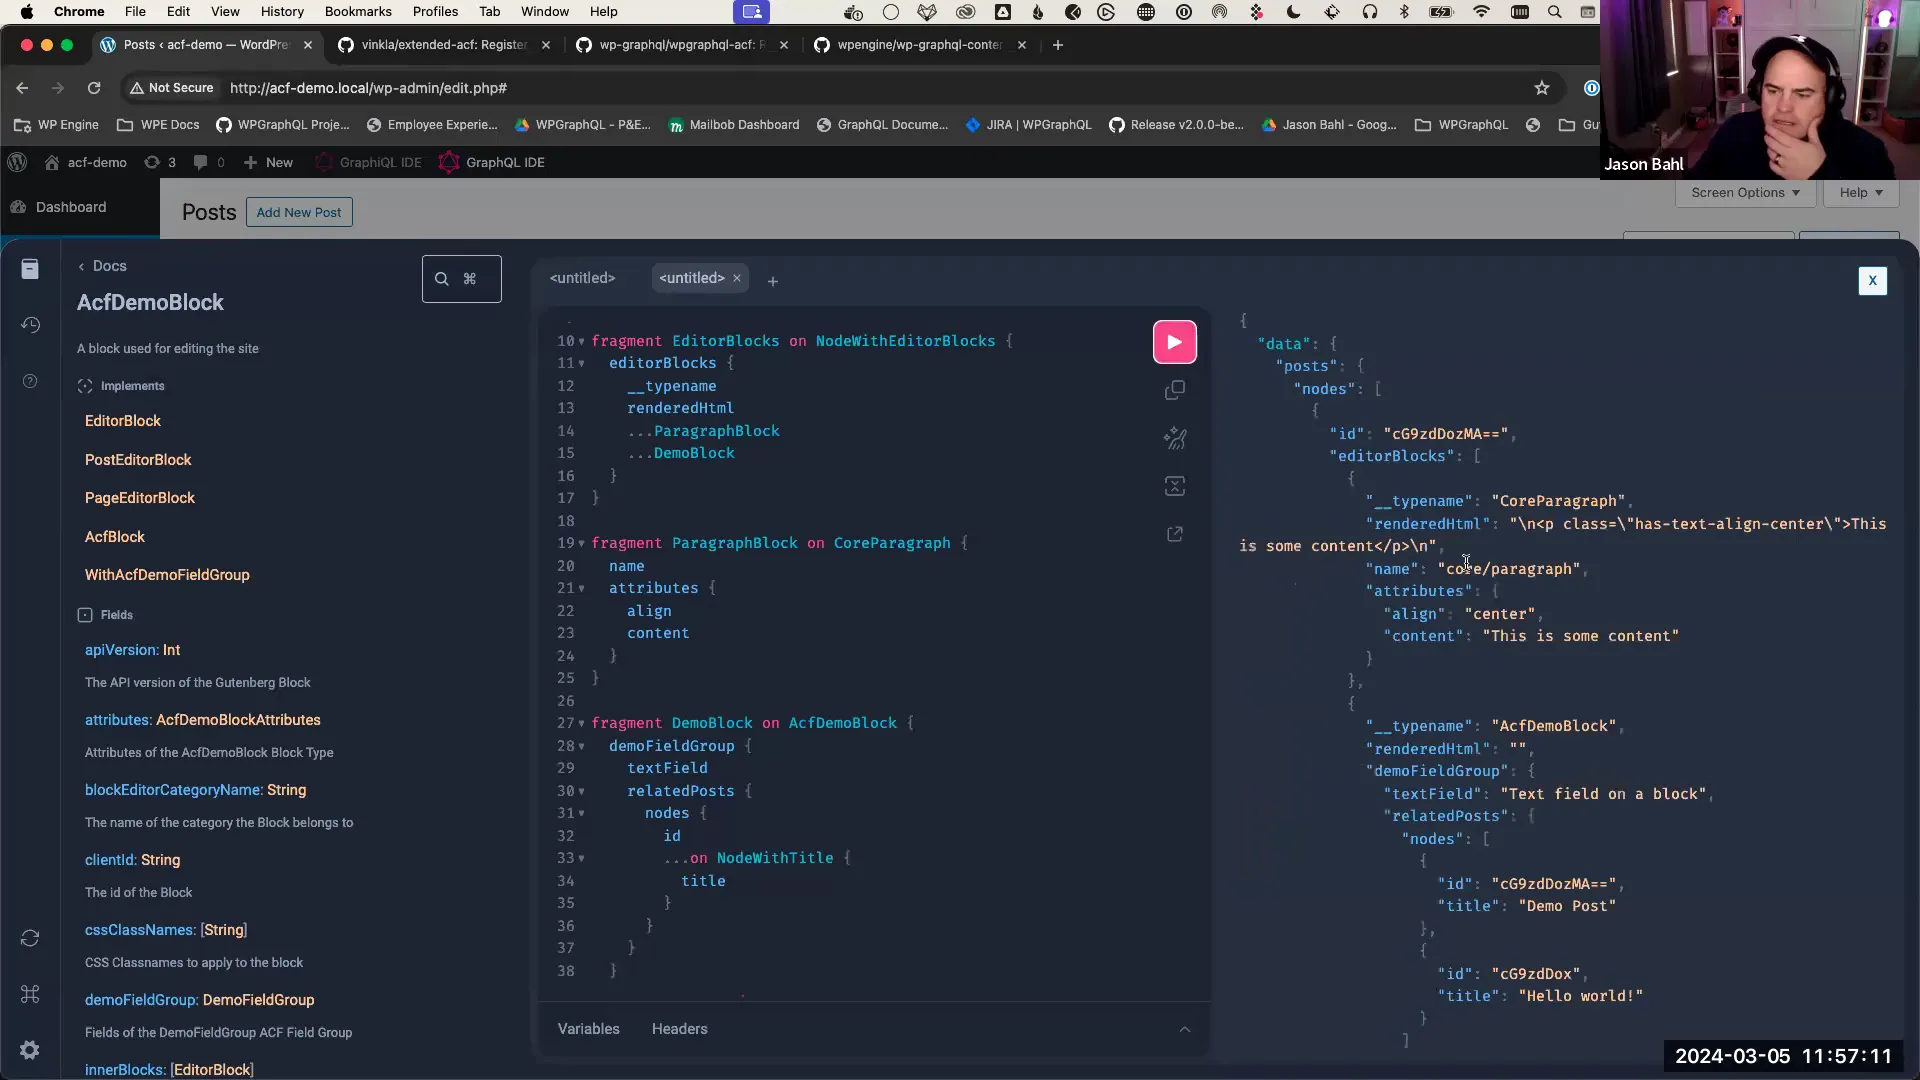
Understanding the GraphQL Schema for ACF Blocks
The WP GraphQL for ACF plugin introduces a new type called ACF Block, which represents all registered ACF blocks. You can query these blocks along with their fields, allowing for dynamic and flexible content retrieval.
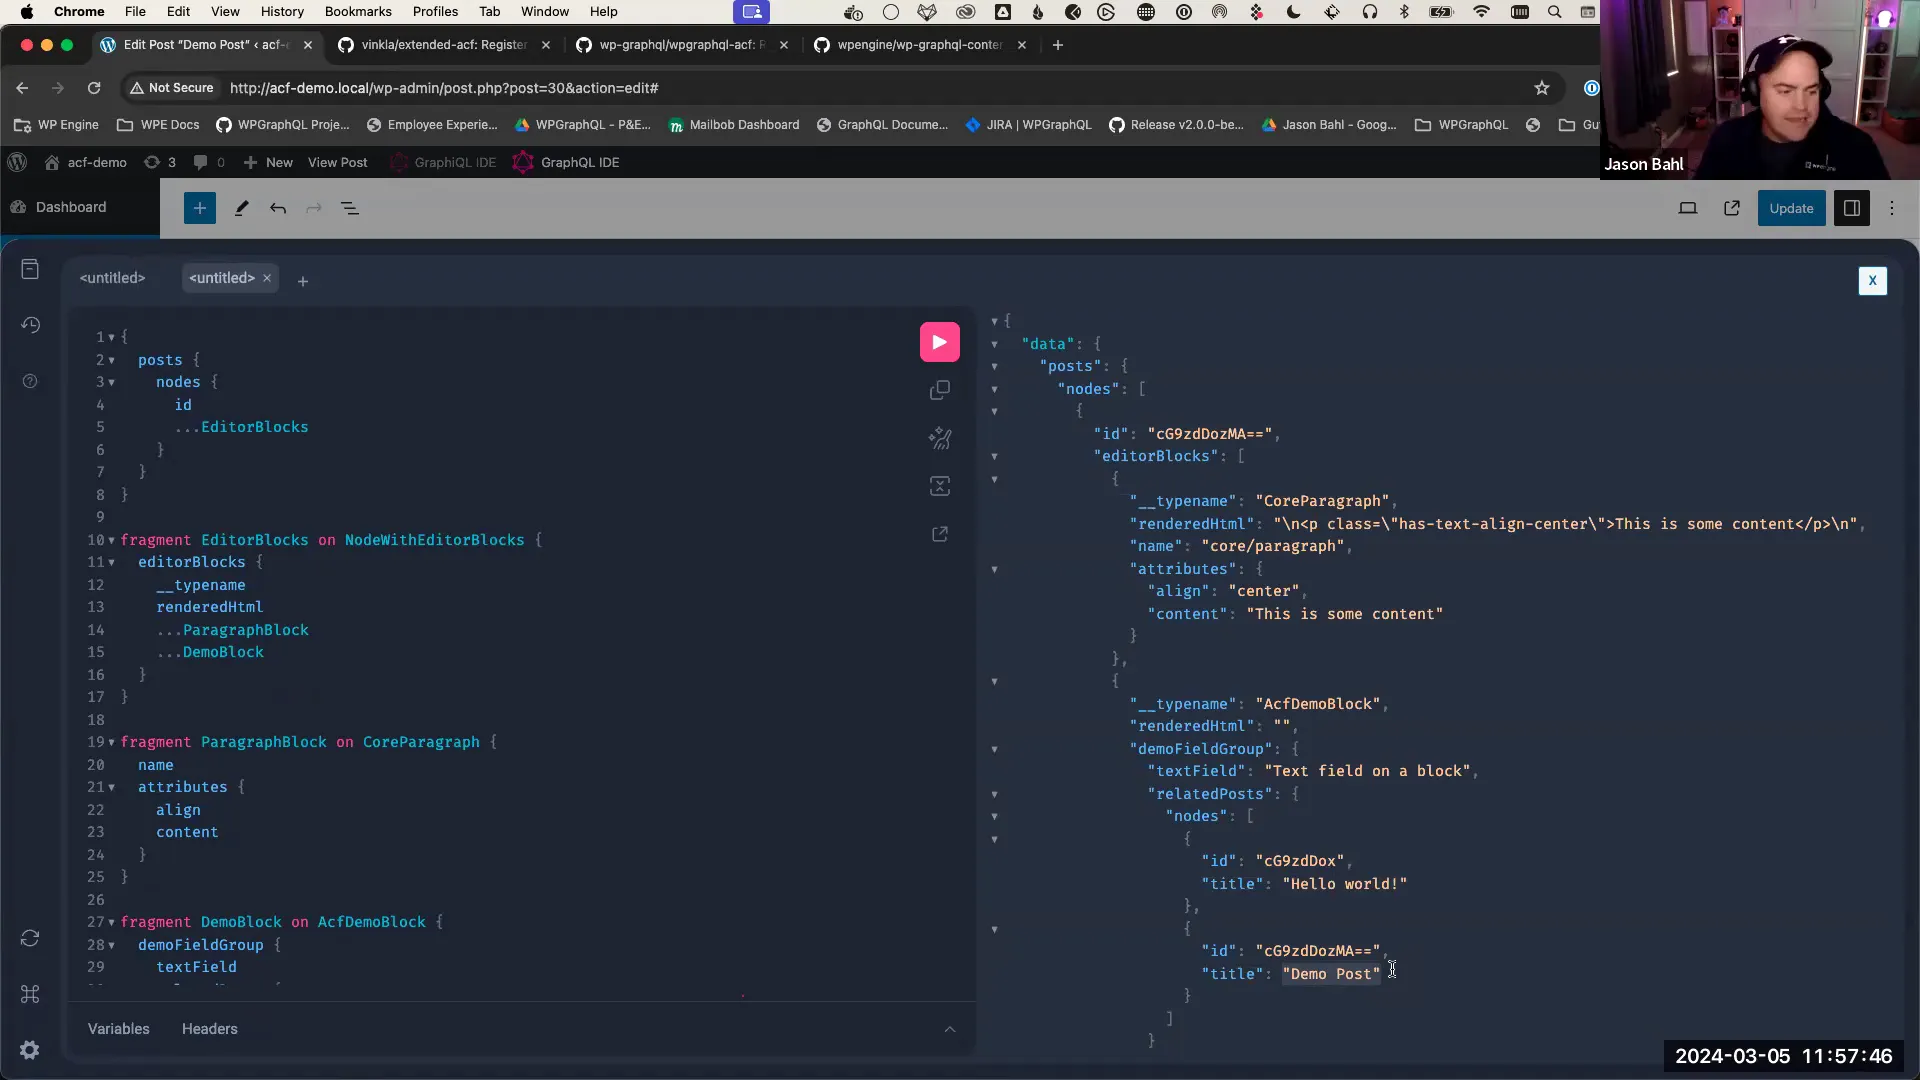
For example, you can start a query to fetch posts and their associated blocks:
{
  posts {
    nodes {
      id
      title
      editorBlocks {
        ... on ACFDemoBlock {
          textField
          relatedPosts {
            nodes {
              id
              title
            }
          }
        }
      }
    }
  }
}
This query retrieves the ID and title of each post, along with the fields defined in your ACF demo block.
Best Practices for ACF and WPGraphQL
Integrating ACF with WPGraphQL can significantly enhance your development workflow. Here are some best practices to consider:
- Use Fragments: Leverage GraphQL fragments to avoid repeating query code, especially when fetching similar data across different queries.
- Keep Fields Organized: Maintain a clear structure for your ACF fields and groups to simplify data management and querying.
- Test Your Queries: Regularly test your GraphQL queries in the GraphiQL IDE to ensure they return the expected results.
- Document Your Schema: Keep documentation of your GraphQL schema and ACF configurations to help team members understand the data structure.
Upcoming Events and Resources
Stay updated with the latest developments in the ACF and WPGraphQL community. Here are some upcoming events and resources:
- Decode Event: Join us on March 19th for US and APAC audiences and March 21st for EMEA. Key presentations will cover practical applications of WPGraphQL with ACF.
- Join the Community: Engage with other developers on our Discord server and WP GraphQL Slack channel. Share your experiences and learn from others.
- Documentation: Access comprehensive documentation for both WPGraphQL and ACF on their respective websites to deepen your understanding.
FAQ
Here are some frequently asked questions regarding ACF and WPGraphQL integration:
1. Do I need to know PHP to use ACF Blocks?
No, ACF Blocks can be registered and managed through the WordPress admin interface, making it accessible for non-developers.
2. Can I use ACF with custom post types?
Yes, ACF can be utilized with custom post types, allowing you to extend the functionality of any content type in WordPress.
3. What if I encounter issues with WPGraphQL?
If you experience any problems, feel free to report them on the GitHub repository or reach out to the community on Discord or Slack for assistance.